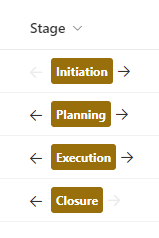
Learn how to create an interactive button to change status for a project/item in SharePoint
The challenge
If you have a list item (it could be a project) you probably have some stages for the specific project.
Having a standard choice field might help you to control the stages, but the user first have to open the info panel, and there is a risk that they don’t know or select the wrong, next stage
If the stages are not dynamic, we can use JSON formatting to create a button, that changes the status for the user

The solution
Step 1
Create a new choice column (not multi choice)
Note that the first name you give the column will be the internal name which we need for the json code.
I have created a new column with the name Stage and the following choices
- Initiation
- Planning
- Execution
- Closure
Step 2
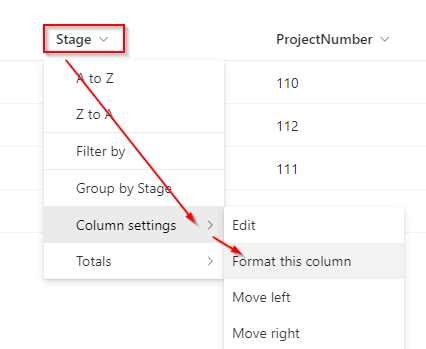
If you have made the exact same column, with the same choices as me, you can copy-paste the below code.
If not, copy it into Visual Studio Code and make the nessesary changes as descriped in step 3

The JSON code
{
  "$schema": "https://developer.microsoft.com/json-schemas/sp/v2/column-formatting.schema.json",
  "elmType": "div",
  "style": {
    "display": "=if(@currentField == '', 'none', 'flex')"
  },
  "children": [
    {
      "elmType": "div",
      "attributes": {
        "iconName": "ChromeBack",
        "class": "=if(@currentField != 'Initiation','ms-fontColor-neutralPrimary ms-fontColor-themePrimary--hover', 'ms-fontColor-neutralLight')"
      },
      "style": {
        "cursor": "pointer",
        "padding-right": "4px",
        "padding-top": "4px"
      },
      "customRowAction": {
        "action": "setValue",
        "actionInput": {
          "Stage": "=if(@currentField == 'Closure', 'Execution', if(@currentField == 'Execution', 'Planning', if(@currentField == 'Planning', 'Initiation', @currentField)))"
        }
      }
    },
    {
      "elmType": "div",
      "children": [
        {
          "elmType": "div",
          "style": {
            "flex-direction": "row",
            "display": "flex"
          },
          "children": [
            {
              "elmType": "div",
              "style": {
                "width": "100%",
                "height": "26px",
                "border-radius": "3px",
                "align-items": "center",
                "justify-content": "space-evenly",
                "margin": "5px"
              },
              "attributes": {
                "class": "ms-bgColor-themePrimary ms-bgColor-themeDarker--hover ms-fontColor-white ms-fontSize-12 ms-fontWeight-bold"
              },
              "children": [
                {
                  "elmType": "div",
                  "style": {
                    "margin": "5px"
                  },
                  "txtContent": "@currentField"
                }
              ]
            }
          ]
        }
      ]
    },
    {
      "elmType": "div",
      "children": [
        {
          "elmType": "div",
          "attributes": {
            "iconName": "ChromeBackMirrored",
            "class": "=if(@currentField != 'Closure','ms-fontColor-neutralPrimary ms-fontColor-themePrimary--hover', 'ms-fontColor-neutralLight')"
          },
          "style": {
            "cursor": "pointer",
            "padding-right": "4px",
            "padding-top": "4px"
          },
          "customRowAction": {
            "action": "setValue",
            "actionInput": {
              "Stage": "=if(@currentField == 'Initiation', 'Planning', if(@currentField == 'Planning', 'Execution', if(@currentField == 'Execution', 'Closure', @currentField)))"
            }
          }
        }
      ]
    }
  ]
}
Step 3
To make the code work for your own column, and with your own choices do the following changes
Change 1
Line 22 and 80
Change Stage the the internal name of your column

Change 2
Line 12 change the word Initiation to the first choice/step in your stage

Change 3
Line 70 change the word Closure to the last choice/step in your stage

Change 4
Line 22 is your stage backwards so if the current stage is Closure then change to Execution, if Execution change to Planning and so on…
"Stage": "=if(@currentField == 'Closure', 'Execution', if(@currentField == 'Execution', 'Planning', if(@currentField == 'Planning', 'Initiation', @currentField)))"
Change 5
Line 80 is your stage the other way around. Again if the current stage is Initiation change to Planning, if current stage is Planning change to Execution and so on…
"Stage": "=if(@currentField == 'Initiation', 'Planning', if(@currentField == 'Planning', 'Execution', if(@currentField == 'Execution', 'Closure', @currentField)))"
We now have more control of the stages, and the user can now quickly change status by clicking the arrow.