Learn how to create an interactive button for users to confirm document reviews
The challenge
A company use SharePoint as an DMS/IMS (Document Management System / Integrated Management System)
They must review their documents after a specific number of months, to comply to their ISO certification.
We must create a solution where the system helps the users to be reminded when to review their documents.
It should be easy to confirm that the document is reviewed, and set a new date for the next review.
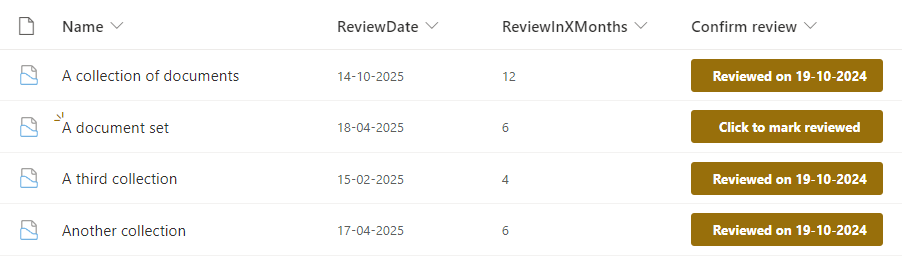
This is our final goal
The solution
Step 1
This example will be based on Document Sets, and if you are not familiar with them, you can read this excellent article by SharePoint Maven
By following the guide above, turn on Document Sets for your SharePoint page, and add a Document Set as a new content type
Add the following columns to your Document Set
- ReviewDate (Date)
- ReviewInXMonths (Number)
- ConfirmReview (Text)
Step 2
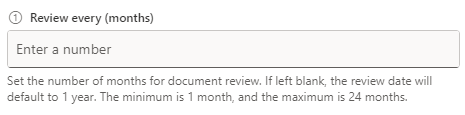
When the user creates a new Document Set we will ask, in how many months they would like to review the documents in the Document Set.
Since a specific date is not important, we just ask the user about the number of months, and we will let Power Automate calculate the first review date.
Step 3
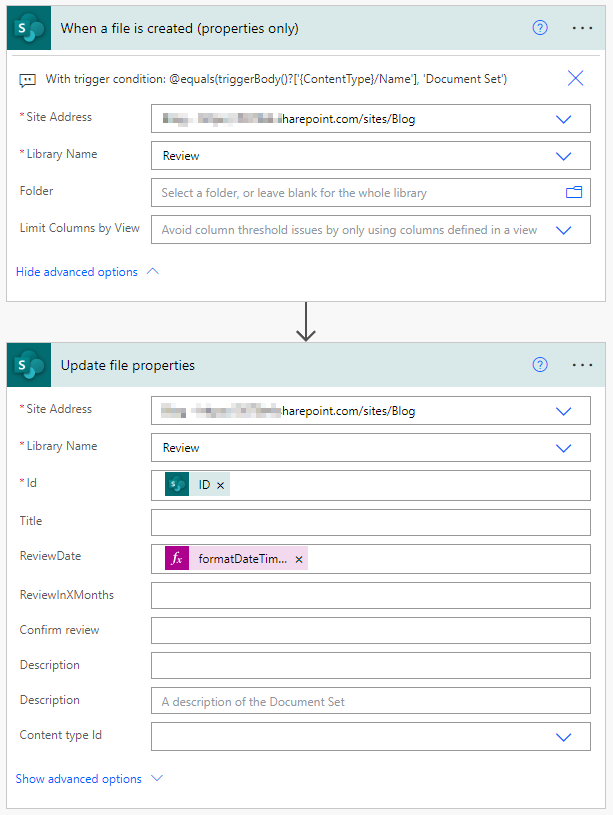
Create a new automated cloud flow and as your trigger select When a file is created (properties only)
We only want our Power Automate to trigger when a new Document Set is created
Open the settings panel of your trigger action and navigate to trigger conditions
Insert the following code
@equals(triggerBody()?['{ContentType}/Name'], 'Document Set')

Step 4
Insert an update file properties action
We know from the user in how many months they would like to review their document, so we can write an expression to calculate the next review date
Insert the following expression in ReviewDate
formatDateTime(addToTime(utcNow(), int(triggerOutputs()?['body/ReviewInXMonths']), 'Month'), 'yyyy-MM-dd')

If your ReviewInXMonths field is not obligatory, you can expand the flow, so that if ReviewInXMonths is null then the flow should update ReviewDate with perhaps 12 months in the future.
It is important that ReviewDate and ReviewInXMonths is newer left blank, otherwise our Click to mark reviewed button that we will create next, won’t work.
Here is the entire flow
Step 5
Navigate back to your SharePoint library and create a few Document Sets.
You only need to fill out Name and ReviewInXMonths, and Power Automate will auto update the ReviewDate
Step 6
When the user has reviewed the documents, we want them to be able to quickly confirm that the documents has been reviewed, and then let the system calculate the next review date.
We will do that by adding a custom JSON formatted button.
In the ConfirmReview insert the following code into format this column settings
{
  "$schema": "https://developer.microsoft.com/json-schemas/sp/v2/column-formatting.schema.json",
  "elmType": "div",
  "style": {
    "align-items": "center",
    "margin-top": "2px",
    "margin-bottom": "2px"
  },
  "children": [
    {
      "elmType": "button",
      "customRowAction": {
        "action": "setValue",
        "actionInput": {
          "Confirmreview": "=padStart(toString(getDate(@now)),2,'0')+'-'+padStart(toString(getMonth(@now)+1),2,'0')+'-'+toString(getYear(@now))",
          "ReviewDate": "=getYear(addDays(@now, Number([$ReviewInXMonths]) * 30))+'-'+padStart(toString(getMonth(addDays(@now, Number([$ReviewInXMonths]) * 30))+1),2,'0')+'-'+padStart(toString(getDate(addDays(@now, Number([$ReviewInXMonths]) * 30))),2,'0')"
        }
      },
      "attributes": {
        "class": "ms-bgColor-themePrimary ms-bgColor-themeDarker--hover ms-fontColor-white",
        "title": "=if(Number(@currentField) == 0, 'Click to mark reviewed', 'Reviewed on ' + @currentField.displayValue)"
      },
      "style": {
        "border": "none",
        "cursor": "pointer",
        "display": "flex",
        "align-items": "center",
        "justify-content": "center",
        "height": "30px",
        "width": "175px",
        "border-radius": "3px"
      },
      "children": [
        {
          "elmType": "span",
          "attributes": {
            "iconName": "",
            "class": "ms-fontSize-16 ms-fontWeight-regular"
          },
          "style": {
            "margin-right": "5px",
            "margin-left": "8px"
          }
        },
        {
          "elmType": "span",
          "txtContent": "=if(Number(@currentField) == 0, 'Click to mark reviewed', 'Reviewed on ' + @currentField.displayValue)",
          "style": {
            "margin-right": "8px",
            "flex": "none"
          },
          "attributes": {
            "class": "ms-fontSize-12 ms-fontWeight-bold"
          }
        }
      ]
    }
  ]
}
If you have not named your columns the same as I have, it is important that you change ConfirmReview and ReviewDate in this part of the code (internal names!)
"Confirmreview": "=padStart(toString(getDate(....",
"ReviewDate": "=getYear(addDays(@now, Number.....
Step 7
Now we can click our new button, and the text in the button will change to todays date and the ReviewDate will be re-calculated to X months into the future