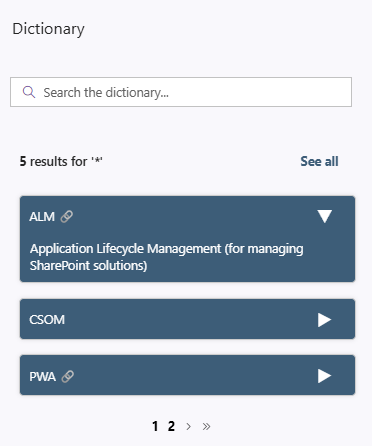
Learn how to create a searchable dictionary with PnP Modern Search
What will we build?
In this blog post we will build a dictionary with a title, links and a description that can be unfolded
Installing PnP Modern Search
If you have not already installed PnP Modern Search on your tenant, you can follow this guide
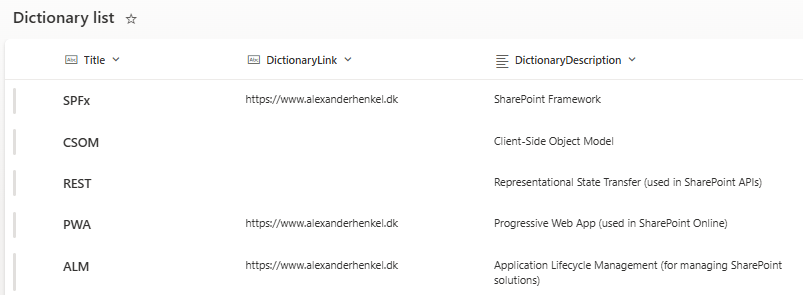
SharePoint list
After installation create a new SharePoint list called dictionary list
Add the following fields to your list
- DictionaryLink (text)
- DictionaryDescription (text)
Add a few items to your list
Setting up PnP Modern Search
Step 1
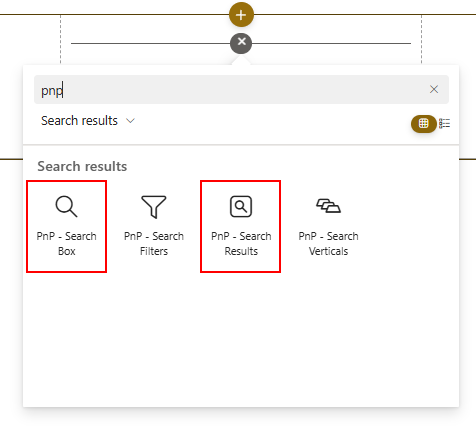
Create a new page and add the following two webparts
- PnP - Search Box
- PnP - Search Results
Step 2
Select the Search Box webpart and select the properties icon.
Insert Search in dictionary… in the Placeholder text to display in search box and change the property Reset query on clear to On
Step 3
Select the Search Result webpart and select the properties icon.
Select under Available data sources SharePoint Search
Go to Query template and insert the following query:
{searchTerms}* path:"https://YOURTENANT.sharepoint.com/sites/YOURSITENAME/Lists/YOURLISTNAME/" contentclass:STS_ListItem
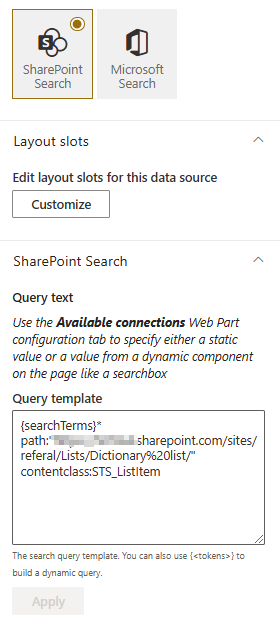
Remember to change in the example above yourtenant, yoursitename and yourlistname
The search crawl might take some time, so if you don’t get any immidiate results, just try again a bit later. You might have to re-index your site, which you can read more about further below
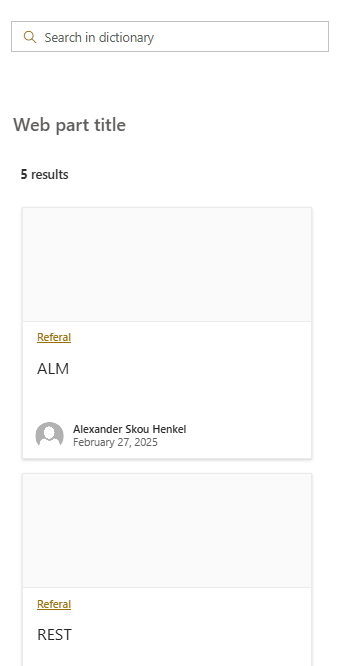
Your setup should now look something like below
Setting up a RefinableString
Before we go any further with setting up our dictionary we need to go to the admin center to setup a RefinableString for our dictionary list
The search center can be accessed using the below link (replace YOURTENANT in the link)
https://YOURTENANT-admin.sharepoint.com/_layouts/15/searchadmin/TA_SearchAdministration.aspx
Click on Manage Search Schema
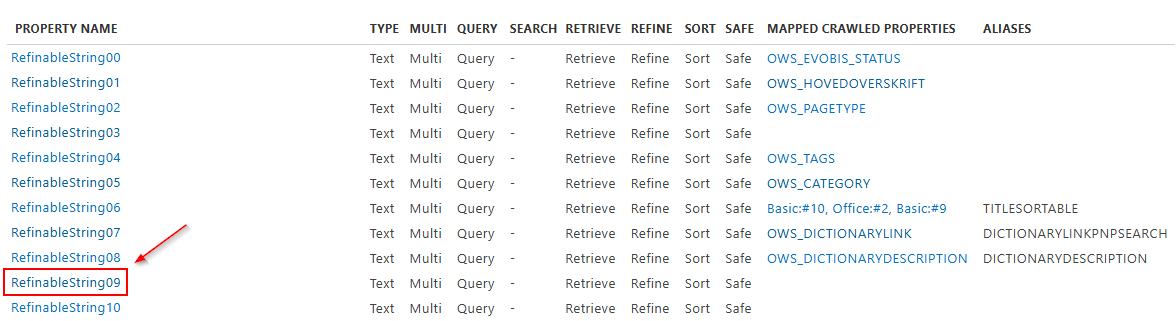
Under Filter write RefinableString and click the green arrow (note that everything you do from here, have patience, the search admincenter is slooooow)
Find a RefinableStringXX that how no Mapped Crawled properties like RefinableString09 in my example below and click on the property name to open it.
Scroll to the bottom of the page and click add mapping
In the crawled property selection window write dictionarylink -> click find and select the property ows_DictionaryLink (if more options show up, only select the one beginning with ows)
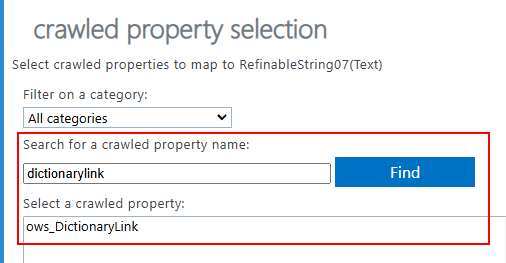
Click OK and in the bottom of the page click OK
Select the next available RefinableString, and do the same thing again, but this time for dictionarydescription
Reindex your list
You can either wait 48 hours for your RefinableString to be “attached” to your items or we can request a reindex of the list.
Go to your list and click the settings icon and select List settings
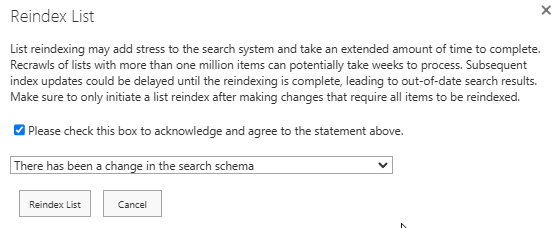
In the list settings select Advanced settings and click the Reindex List button
Setup the popup window as the picture below and click Reindex list
After you have reindexed your list it can still take a long time before the RefinableStrings are ready to work with, but my experience is to wait for about 30 minutes.
Setting up PnP search results.
Go back to the settings pane of the PnP Modern Search Result and go to the Selected properties and click the arrow.
Scroll down and see if your RefinableStrings are available.
If they are not there, wait a bit more!
If they ARE available, select them
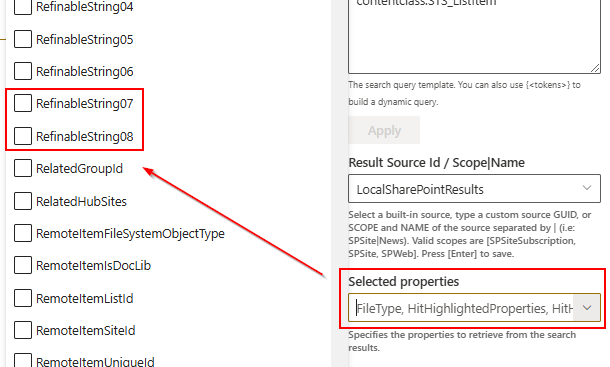
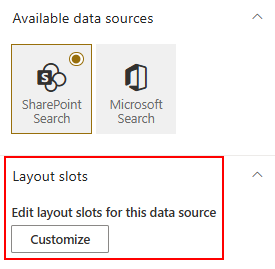
Once the RefinableStrings have been selected, scroll up again and select Customize
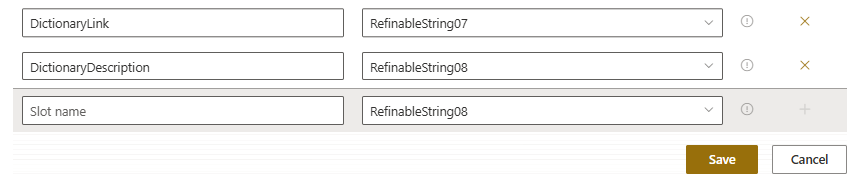
In the bottom of the page insert DictionaryLink and bind it to your RefinableString. Do the same thing with DictionaryDescription
Changing the layout template
In the property pane of the search result webpart, go to page 2 of 4 and select a Custom template**.
Click on Edit results template and replace the entire code with below code
<content id="data-content">
    <style>
        .template--card {
            flex-grow: 1;
            flex-shrink: 1;
            min-width: 100%;
            flex-basis: {{@root.properties.layoutProperties.columnSizePercentage}}%;
        }

        .pnp-QuickLink-box {
            display: flex;
            flex-direction: column;
            align-items: center;
            padding: 4px 10px;
            margin: 0;
            border: 1px solid #ccc;
            border-radius: 5px;
            box-shadow: 0 0 5px rgba(0, 0, 0, 0.1);
            transition: box-shadow 0.3s;
            background-color: #3d5d78;
            width: 100%;
        }

        .pnp-card-first-line {
            display: flex;
            flex-direction: row;
            align-items: center;
            justify-content: space-between;
            color: white;
            width: 100%;
        }

        a {
            color: white;
            text-decoration: none;
        }

        .info-icon,
        .close-icon {
            cursor: pointer;
            font-size: 20px;
            color: white;
            transition: transform 0.3s ease, color 0.2s ease;
            padding: 5px;
            margin-right: 10px;
        }

        .info-icon:hover,
        .close-icon:hover {
            color: #5d90b9;
        }

        .hidden-text {
            display: none;
            color: white;
            font-size: 14px;
            margin: 2px 10px 0 0;
            text-align: left;
            padding: 6px;
            border-radius: 10px;
            width: 100%;
            box-sizing: border-box;
            opacity: 0;
            transform: translateY(-10px);
            transition: opacity 0.3s ease, transform 0.3s ease;
        }

        .toggle-text {
            display: none;
        }

        .toggle-text:checked + .pnp-QuickLink-box .hidden-text {
            display: block;
            opacity: 1;
            transform: translateY(0);
        }

        .toggle-text:checked + .pnp-QuickLink-box .info-icon {
            display: none;
        }

        .toggle-text:checked + .pnp-QuickLink-box .close-icon {
            display: block;
            transform: rotate(360deg);
        }

        .close-icon {
            display: none;
        }

        pnp-pagination a {
            color: black !important;
            font-weight: bold;
            text-decoration: none;
        }

        pnp-pagination a:hover {
            color: black !important;
        }

        pnp-pagination .current-page {
            color: white !important;
            background-color: black !important;
            border-radius: 5px;
            padding: 5px;
        }

        .template--header {
            display: flex;
            justify-content: space-between;
            align-items: center;
            width: 100%;
        }

        .template--see-all {
            margin-left: auto;
            margin-right: 5px;
        }

        .template--see-all a {
            color: #3d5d78;
            text-decoration: none;
            font-weight: bold;
        }
    </style>

    <div class="template--header">
        <div class="template--resultCount">
            {{#if @root.properties.showResultsCount}}
                <label class="ms-fontWeight-semibold">{{getCountMessage @root.data.totalItemsCount @root.inputQueryText}}</label>
            {{/if}}
        </div>
        <div class="template--see-all">
            <a href="https://YOURTENANT.sharepoint.com/sites/YOURSITE/SitePages/YOURSITEPAGEFORSEEALL.aspx">See all</a>
        </div>
    </div>

    <div class="template--cardContainer">
        {{#each data.items as |item|}}
            <div class="template--card">
                <input type="checkbox" class="toggle-text" id="toggle-{{slot item @root.slots.ItemId}}">
                <div class="pnp-QuickLink-box">
                    <div class="pnp-card-first-line">
                        <span class="pnp-QuickLinkBox-title">
                            {{#if (slot item @root.slots.DictionaryLink)}}
                                <a href="{{slot item @root.slots.DictionaryLink}}" data-interception="off" target="_blank">
                                    {{slot item @root.slots.Title}} 🔗
                                </a>
                            {{else}}
                                {{slot item @root.slots.Title}}
                            {{/if}}
                        </span>
                        <label for="toggle-{{slot item @root.slots.ItemId}}" class="info-icon">▶</label>
                        <label for="toggle-{{slot item @root.slots.ItemId}}" class="close-icon">▼</label>
                    </div>
                    <div class="hidden-text">{{slot item @root.slots.DictionaryDescription}}</div>
                </div>
            </div>
        {{/each}}
    </div>

    {{#if @root.properties.paging.showPaging}}
        {{#gt @root.data.totalItemsCount @root.properties.paging.itemsCountPerPage}}
            <pnp-pagination
                data-total-items="{{@root.data.totalItemsCount}}"
                data-hide-first-last-pages="{{@root.properties.paging.hideFirstLastPages}}"
                data-hide-disabled="{{@root.properties.paging.hideDisabled}}"
                data-hide-navigation="{{@root.properties.paging.hideNavigation}}"
                data-range="{{@root.properties.paging.pagingRange}}"
                data-items-count-per-page="{{@root.properties.paging.itemsCountPerPage}}"
                data-current-page-number="{{@root.paging.currentPageNumber}}"
                data-theme-variant="{{JSONstringify @root.theme}}">
            </pnp-pagination>
        {{/gt}}
    {{/if}}
</content>
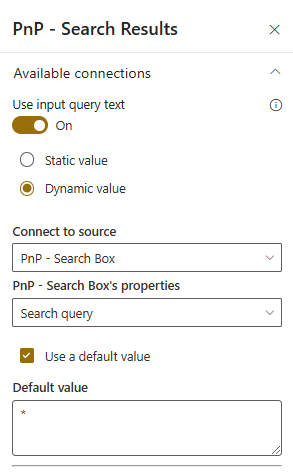
Setting up search inputs
Currently you won’t get any results if you use the search box webpart.
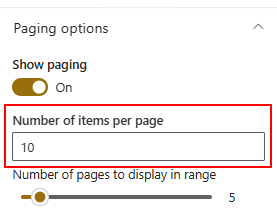
To connect the search result with your search input go to page 3 of 4 and change Use input query text to On and setup the options as below picture
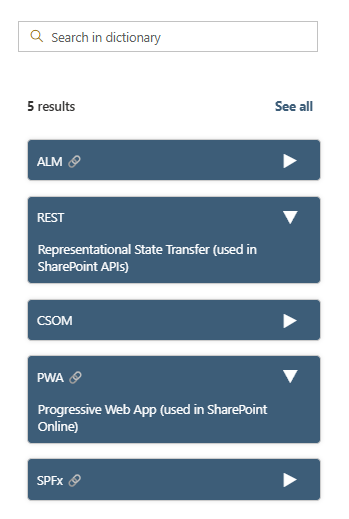
Congratz your now have a fully functional PnP Search Dictionary 🚀
Setting up “see all”
In the properties pane we can control how many items we would like to show pr. page.
If you look in the code above we have the possibility to create a link to another site
      <div class="template--see-all">
 <a href="https://YOURTENANT.sharepoint.com/sites/YOURSITE/SitePages/YOURSITEPAGEFORSEEALL.aspx">See all</a>
 </div>
What I usually setup with the See all is another page with the same search setup, but showing up to 500 results.
The only thing you have to do here, is the remove the above code from this new page, so we don’t have another “See all” available for that page.
You can also create a link directly to your list if you want to - Maybe with some fancy JSON view formatting ;) 🚀
Inspiration
I found the inspiration to build my dictionary search result from the pnp-modern-search-layouts repository @ GitHub
More specifically the Quick Links Look-alike
Thank you Kasper Bo Larsen 🚀